Activity › Forums › Salesforce® Discussions › How to delete records from Salesforce reports using demand tool?
-
How to delete records from Salesforce reports using demand tool?
Posted by Hazel on April 21, 2016 at 10:32 AMI’m new to Salesforce Lightning development, hence please give some inputs on step by step process for deleting certain records from Salesforce reports. Also, tell how this can be done using Demand Tool?
Manpreet replied 9 years, 1 month ago 2 Members · 1 Reply -
1 Reply
-

Hi Hazel,
Step 1. Select Incoming Data Source
Begin by selecting the input file that contains the Id’s of the records to be deleted.

1.) Select the file by clicking Select File
Browse to find the file and click “Open”
2.) If an .xls, .xlsx, .mdb or .accdb file has been chosen the user must select the worksheet/table name to process by clicking on it (will highlight in blue)
Click Use on the right or double click to select (the fields from the spreadsheet/table will populate in the left column of the page)
The number of records loaded will be displayed in red
Read CSV as UTF8: Select this option to force files to open in UTF-8 encoding, even if they were saved in a different format
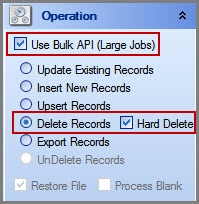
Ensures that special characters are imported correctlyStep 2. Select the Delete Records Operation
# Deletes records for one object per pass
A Salesforce cascading delete IS performed
# Check Use Bulk API if desired
Hard Delete available ONLY when Bulk API is selected
More information on Bulk API can be found here here
Note: Hard deleted records DO NOT go the recycle bin therefore CANNOT be undeleted.
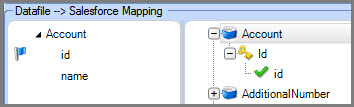
Step 3. Field Mappings
Map the Id field from the input file to the Id field in the desired Salesforce object.

Step 4. Process the Delete
To perform the chosen operation click in the lower right
> By default ALL the input rows will be processed
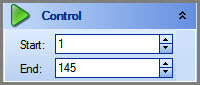
> When using an xls, xlsx or csv file as the input source only specific rows can be selected for processing by changing the starting and ending rows using the Control option on the right
To process the first row from a data source change the End number to 1
Start: 1 refers to the “start of data” which is actually row 2 of the input file
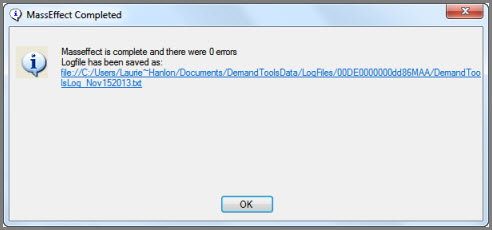
> Changing the Start/End values allows for testing a small portion of the input file before processing the entire fileA Status pop-up will be displayed when the operation is complete noting if there were any errors and listing any results files created (e.g. Logfile, Success/Error Files, IdSave files, Restore files). Links are provided to access the results file DIRECTLY from the status pop-up.

Thanks.

Log In to reply.
