Toggle Side Panel

  • Home
  • Articles
    • All Articles
    • Blogs
    • Videos
    • Infographics
  • Consultants
    • Salesforce Product Expertise
      • Top Salesforce ConsultantsTop Salesforce Consultants
      • Marketing Cloud ConsultantsMarketing Cloud Consultants
      • Service Cloud ConsultantsService Cloud Consultants
      • Experience Cloud ConsultantsExperience Cloud Consultants
      • Analytics Cloud ConsultantsAnalytics Cloud Consultants
    • Salesforce Industry Expertise
      • Non-Profit Cloud ConsultantsNon-Profit Cloud Consultants
      • Financial Service Cloud ConsultantsFinancial Service Cloud Consultants
      • Health Cloud ConsultantsHealth Cloud Consultants
      • Commerce Cloud ConsultantsCommerce Cloud Consultants
      • Manufacturing Cloud ConsultantsManufacturing Cloud Consultants
    • Salesforce Experts by Location
      • USATop Salesforce Consultants in USA
      • IndiaTop Salesforce Consultants in India
      • AustraliaTop Salesforce Consultants in Australia
      • United KingdomTop Salesforce Consultants in UK
      • CanadaTop Salesforce Consultants in Canada
  • Webinars
  • Contact Us
  • Discussions
More options
    Sign in Sign up
    • Home
    • Articles
      • All Articles
      • Blogs
      • Videos
      • Infographics
    • Consultants
      • Salesforce Product Expertise
        • Top Salesforce ConsultantsTop Salesforce Consultants
        • Marketing Cloud ConsultantsMarketing Cloud Consultants
        • Service Cloud ConsultantsService Cloud Consultants
        • Experience Cloud ConsultantsExperience Cloud Consultants
        • Analytics Cloud ConsultantsAnalytics Cloud Consultants
      • Salesforce Industry Expertise
        • Non-Profit Cloud ConsultantsNon-Profit Cloud Consultants
        • Financial Service Cloud ConsultantsFinancial Service Cloud Consultants
        • Health Cloud ConsultantsHealth Cloud Consultants
        • Commerce Cloud ConsultantsCommerce Cloud Consultants
        • Manufacturing Cloud ConsultantsManufacturing Cloud Consultants
      • Salesforce Experts by Location
        • USATop Salesforce Consultants in USA
        • IndiaTop Salesforce Consultants in India
        • AustraliaTop Salesforce Consultants in Australia
        • United KingdomTop Salesforce Consultants in UK
        • CanadaTop Salesforce Consultants in Canada
    • Webinars
    • Contact Us
    • Discussions
    Close search
    Salesforce to Salesforce SSO using Authentication Provider

    Salesforce to Salesforce SSO using Authentication Provider

    shariq Sep 10, 2018
    10,965  Views

    As many users work on multiple Salesforce instances and it is very difficult to memorize password for each, therefore we connect multiple Orgs together so Login from one will give access for others. Here one salesforce org will act as an Identity Provider (IdP) and other as a service provider (SP). Identity Provider org will be the org where we are already logged in and Service Provider org will be the org to where we have to log in from identity provider org.

    Steps to setup SSO with Authentication Provider:

    • We start with our service provider org, first enable MyDomain in this org by navigating to Setup>My Domain.
    • Go to setup and type Apps in quick/find a search box, click on the Apps link under Create heading.
    • Click the New button in the Connected Apps section.
    • Fill up the required fields(Connected App Name, API Name, and Contact Email).
    • Enable the Enable OAuth Settings checkbox.
    • Fill the Callback URL with some custom dummy URL, we will come back to it later.
    • Select all the values of Selected OAuth Scopes multi picklist field.
    • Click the Save button, then click Continue.
    • Here you will get Consumer Key and Consumer Secret, which will be needed in Identity Provider org setup.
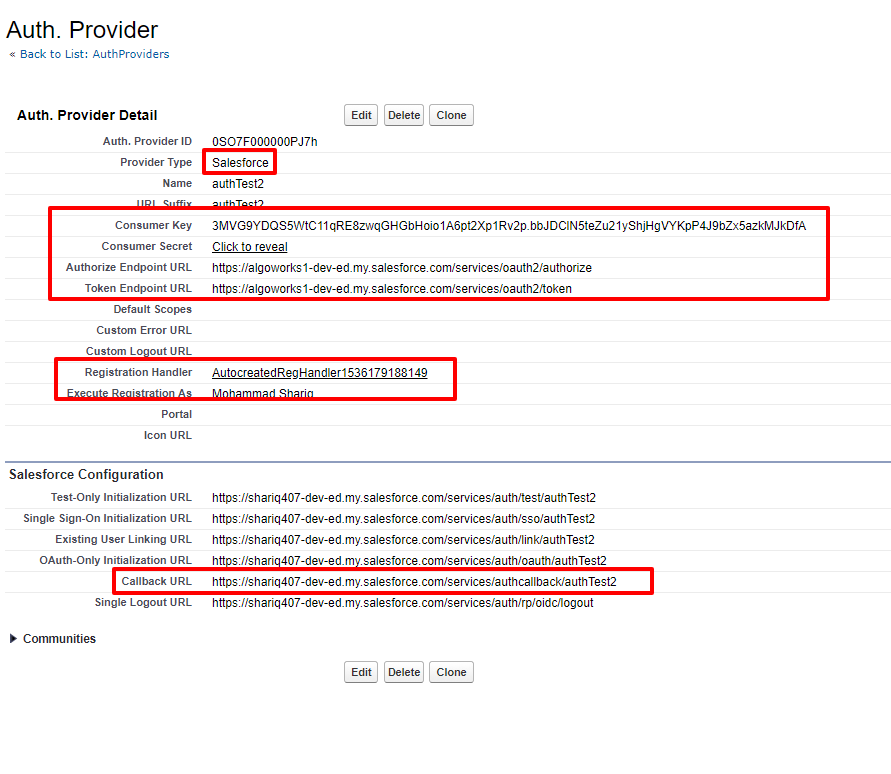
    • Now go to your Identity Provider salesforce instance and type Auth.Provider in quick/find search box, click on the Auth. Provider link.
    • Click the New button to create Auth. Provider record.
    • Select Salesforce in the Provider Type picklist field.
    • Type the desired Name and URL Suffix.
    • Copy the Consumer Key and Secret from SP instance’s connected app which we have just created and paste it in the respective Consumer Key and Secret fields.
    • Fill the Authorization Endpoint Url with ‘https://{!IdentityProviderDomainName}/services/oauth2/authorize’ and Token Endpoint URL with ‘https://{!IdentityProviderDomainName}/services/oauth2/token’.
    • Click on Automatically create a registration handler template link, this will generate a class.
    • Select User in who should be executing this class when the user tries to login in to the service provider.
    • Click Save.
    • Click the Registration Handler class link, it should be something like this – AutocreatedRegHandler1536012957493, this is the class that executes when a user tries to log in.
    • Copy the Callback Url and paste it in the custom app’s Callback Url field of the service provider.
    • Create a new field in User sObject of IdP, let’s say API Name be SPUsername__c, copy the username of SP user to which you have to login in SP instance.
    • Now copy the below code into Registration Handler class of IdP and replace the class name with your handler class
      /*****************************
      Class Name: AutocreatedRegHandler1536012957493
      Author : Mohammad Shariq(Algoworks)
      ******************************/
      global class AutocreatedRegHandler1536012957493 implements Auth.RegistrationHandler{
          //This method is for matching the both IdP and SP user. This will run for first time  to relate both users.
          global User createUser(Id portalId, Auth.UserData data){
              User u = [SELECT ID FROM User Where SPUsername__c = : data.username];
              return u;
          }
      //This method is executed after when users are related, you write your logic as requiredglobal void updateUser(Id userId, Id portalId, Auth.UserData data){}}
    • Now we need to add a button on IdP domain login page.
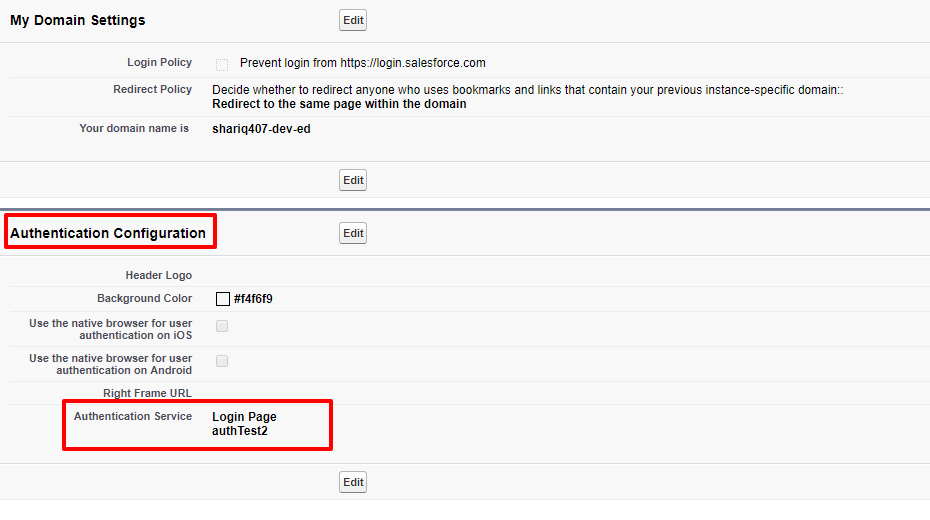
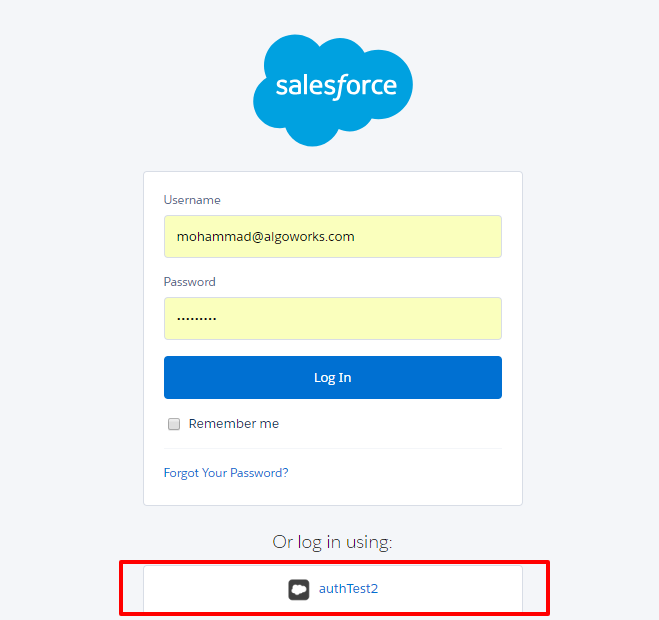
    • Go to My Domain as told earlier and click on Edit button under Authentication Configuration section.
    • Select the checkbox for the Auth. Provider that you have just created and click Save.
    • This button will be visible only on Domain login page (Domain Url) not in https://login.salesforce.com or https://test.salesforce.com.
    Categories: Others
    Tagged: API Name, Authentication Configuration, Authentication Provider, Callback, Connected Apps, Domain URL, Identity Provider, Login URL, oAuth2, Picklist Field, Quick FindBox, Registration Handler, Salesforce Org, Service Provider, Single Sign On, SSO, Tokens, URL Suffix, User Authentication, User Data
    salesforce consultants
    Footer Forcetalks logo

    support@forcetalks.com

    • twitterx

    Quick Links

    Advertise with Us

    Salesforce® Articles

    Dreamforce 2023

    Top Salesforce® Bloggers 2023

    Top Salesforce Consultants

    Get Listed

    Company

    Contact Us

    About Us

    Privacy Policy

    Terms & Conditions

    InsightHub

    Salesforce Blogs

    Salesforce Videos

    Salesforce Groups

    Salesforce Jobs

    © 2026 - Forcetalks ● All Rights Reserved

    Salesforce® is a trademark of Salesforce® Inc. No claim is made to the exclusive right to use “Salesforce”. Any services offered within the Forcetalks website/app are not sponsored or endorsed by Salesforce®.

    Try AuditMyCRM - It is a Salesforce CRM Audit tool which comprehensively scans your Salesforce org and gives you the list of errors or warnings you need to take care of.
    We use cookies to enhance your browsing experience. Please see our privacy policy if you'd like more information on our use of cookies.